

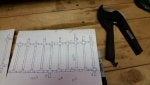
Alright, this is my first attempt at posting one of these tutorials. I am fortunate to have someone I know that is great at drawing out the plans that I have in my brain  I wanted a Halloween fence in front of my house last year, but since I didn't have a saw and didn't feel like begging my friends to let me borrow one, I thought this would be a safe idea. My folks live in Topeka, KS and their neighbor had said they built theirs out of PVC Pipe and it wasn't too terrible cost wise. So, we sketched up a plan, and went out and bought the pieces.
![]()
Now, the cost wasn't terrible. We bought 10 ft. sections of the PVC pipe and those were fairly cheap (around 2 bucks). I had to buy a pipe cutter, but it was the best $9 I could've spent at Menards possible. It was really smooth and made fairly decent cuts.
![]()
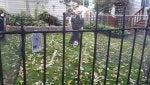
We knew what the measurements were, so we bought enough pipe to build the fence. Now, the cross bars were expensive as hell. Those were pricey! Keep that in mind. You can buy contractors packs here of the t bars, but the + ones were expensive After getting all of our pieces cut
![]()
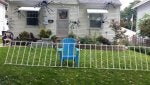
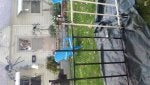
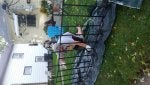
we went to the front yard and started to assemble it. Now, we had the + parts every other because we knew we wanted the fence to have a staggered look.
![]()
We were going to raise those up 3", 4", and 5" respectively and thought it would have a nice pattern of traveling up and down.
![]()
You might notice that we had + bars across the bottom as well. That was so we could put large garden spikes in there to mount it into the yard. We put a large garden spike into each "panel". (A panel was a section that contained 6 pieces of pvc pipe with the 6th pipe always being a + joint)....if that makes any sense. We also put caps onto the top of the PVC pipe so that rain/snow didn't get in there.
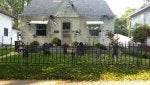
After we put the fence up, we were too excited to take the damn thing down, so we brought the tarps up, carefully wrapped around the bottom and got to spray painting. We bought 5 cans of spray paint of the project, and it took maybe 2.5 at most.
![]()
![]()
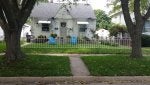
Afterwards came the fun part. We put out the tombstones we had purchased (we are planning on making some this year thanks to the great tutorials posted on here!) and add some flair. I put on some cheap gauze material to the fence and it was really cool blowing in the wind.
![]()
![]()
Last year I bought some blood dripped edison bulbs to add to it, so I think that will look fun. We are looking to buy some finials for the top of the fence this year, and to have some sort of archway/gate.
I'd be happy to answer any questions about our fence! The total price came in around 50 bucks-- mostly because of the damn + pieces and we needed a lot of the them. The PVC was pretty cheap and very easy to work with. We had to buy a lot of caps and the spray paint wasn't cheap, but worth it to buy one that covers the area pretty smoothly.
I wanted a Halloween fence in front of my house last year, but since I didn't have a saw and didn't feel like begging my friends to let me borrow one, I thought this would be a safe idea. My folks live in Topeka, KS and their neighbor had said they built theirs out of PVC Pipe and it wasn't too terrible cost wise. So, we sketched up a plan, and went out and bought the pieces.
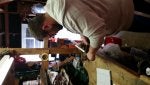 After getting all of our pieces cut
After we put the fence up, we were too excited to take the damn thing down, so we brought the tarps up, carefully wrapped around the bottom and got to spray painting. We bought 5 cans of spray paint of the project, and it took maybe 2.5 at most.
Afterwards came the fun part. We put out the tombstones we had purchased (we are planning on making some this year thanks to the great tutorials posted on here!) and add some flair. I put on some cheap gauze material to the fence and it was really cool blowing in the wind.
I'd be happy to answer any questions about our fence! The total price came in around 50 bucks-- mostly because of the damn + pieces and we needed a lot of the them. The PVC was pretty cheap and very easy to work with. We had to buy a lot of caps and the spray paint wasn't cheap, but worth it to buy one that covers the area pretty smoothly.


