

I recently posted photos of a couple of creepers I built on a couple of Facebook Halloween forums and had a lot of people ask for tutorials. so I decided to build another one and take a lot of pictures. I figured this was a good place to post the tutorial for people who are interested. When you do this you will be using a process known as plastic corpsing. If you have never done it, check out this 20 minute video from Stiltbeast Studios. He does an excellent job showing you how to corpse. It is actually pretty easy and well worth the time to watch.
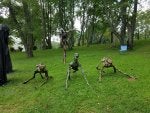
Basically our goal is to take this:
![]()
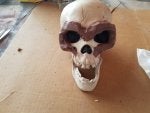
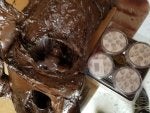
and make this
![]()
![]()
![]()
Materials I used:
Steps:
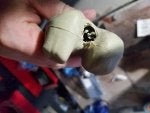
1. One of the things I do is lengthen the arms. I do this by popping the bottom arm bone and hand out of the upper arm bone and adding in an extra bone. if you don't have extra bones lying around it should not be to hard for you to modify a 12-14 inch piece of 3/4pvc pipe or replace the arms altogether with pvc pipes, and a couple of 90 and 45 degree elbows.
![]()
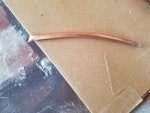
the bones I used to extend the arms were flimsy. So I inserted a dowel rod and some good stuff foam to strengthen the bones. This is optional depending on how you do this step.
![]()
![]()
![]()
After the bones are prepped and strengthened. I Attach the new bone in between the two existing arm bones. I use deck screws and then cover with/ attach with gorilla tape. If you do this right it's actually very stable.
![]()
![]()
![]()
![]()
by the time you are done, you will have nice long front arms that will give the final prop a nice creepy unnatural look.
Basically our goal is to take this:

and make this


Materials I used:
- Costco Skeleton. About $40 from Costco.com right now. They are available right now but not year round.
- 3/8 inch Flexible copper tubing.
- Extra prop bones. You couple probably also use 3/4 in pvc pipe if you don't have any bones laying around.
- 3 inch deck screws http://www.homedepot.com/p/Deckmate.../p/Deckmate-9-x-3-in-Star-Flat-Head-Wood-Deck-Screws-5-lb-Pack-734968/202308663
- JB marine weld epoxy J-B Weld 2 oz. Waterweld 8277 - The Home Depot you can get it at Home Depot for under $6
- Plastic tarp: HDX 9 ft. x 12 ft. 0.7 mil Drop Cloth (3-Pack) DCHD-07-3 - The Home Depot
- Gorilla Tape: http://www.homedepot.com/p/Gorilla-1-7-8-in-x-12-yds-Heavy-Duty-Duct-Tape-60012/100557598
- Zip ties
- Hickory gel Stain: http://www.homedepot.com/p/Minwax-1-qt-Hickory-Gel-Stain-66100/202061480
- Dowel Rod
- Clay
Steps:
1. One of the things I do is lengthen the arms. I do this by popping the bottom arm bone and hand out of the upper arm bone and adding in an extra bone. if you don't have extra bones lying around it should not be to hard for you to modify a 12-14 inch piece of 3/4pvc pipe or replace the arms altogether with pvc pipes, and a couple of 90 and 45 degree elbows.

the bones I used to extend the arms were flimsy. So I inserted a dowel rod and some good stuff foam to strengthen the bones. This is optional depending on how you do this step.


After the bones are prepped and strengthened. I Attach the new bone in between the two existing arm bones. I use deck screws and then cover with/ attach with gorilla tape. If you do this right it's actually very stable.


by the time you are done, you will have nice long front arms that will give the final prop a nice creepy unnatural look.


")


