

I built this prop about 8 years ago, and it's always a big hit in the neighborhood. I've gotten a lot of requests from various forum members over the years for information on how I built it. I even wrote up a tutorial for it about 4 years ago, but never posted it. Don't know why---too busy building other props, I guess. I just recently had a few requests for info. on it, so I figured it's high time to finally get this thing posted. It may take a couple of days to get it all on here and for me to correct any dumb mistakes I might have made.
Anyway, here it is:
Animated Swinging Skeleton

VIDEO of PROP:
http://vidmg.photobucket.com/albums/v630/DaveNTracy/Swinging Skeleton/DSCN0546_zps1wcbq6hc.mp4
http://vidmg.photobucket.com/albums/v630/DaveNTracy/Swinging Skeleton/DSCN0547_zpsgyxgukzr.mp4
Parts List
A. SWING
(1) 14 1/2 X 5" piece of wood, 3/4 to 1" thick (or similar)
Sisal Rope (about 12 ft.)
(1) Skeleton (I used a 3 ft. child size skelly)
Fishing Line
(2) Long wood screws, 2 to 3 " long.
Bailing wire
B. SWING ROCKER
(1) Wood piece, 14 1/2" long.
(2) 1 X 2" wood pieces, 6 1/2" long each.
(6) #8 X 1 1/4" wood screws
(2) 3/4" PVC straight couplers
(6) #8 X 3/4" wood screws
(2) 9" long sections of 1 X 2" wood.
(1) 1/2" PVC section, about 14 1/4" long.
(1) 11 1/2" long section of 1 X2" wood.
(3) Small eye bolts
(2) #8 Flat Washers
(1) Large U-Bolt w/nuts (Or a 1/4" X 20 Threaded Rod and Nuts and a 6" long scrap wood piece.)
Thin Nylon Rope
C. MOTOR PLATFORM
(1) 24 RPM Gear Motor (or similar)
(1) AC/DC Power Adapter for Motor
(1) Wood board, measuring approx. 11 X 5 1/2"
Hardware to mount Motor to wood board. (Varies, depending on motor type-Bolts, Nuts, Lock Washers..)
(1) 4 inch section of 1/2 X 1/8" Flat Aluminum Stock for motor shaft.
(1) Small Pulley
Hardware to mount pulley to motor crank.
(1) 13 1/2" section of a 1 X 3" wood board.
(1) 13 1/2" section of a 1 X 2" wood board.
(4) #8 X 1 1/4" Wood Screws
(1) Large 1/4" diameter U-Bolt w/ nuts. (Or 1/4" X 20 threaded rod w/ nuts, washers and a 8" long piece of scrap wood.)
Thin Nylon Rope
Fishing Line
Theory of Operation
The way in which the swing works is fairly simple. The whole system consists of three different parts: The Motor Platform, the Rocker Assembly and the Swing itself (with the skeleton).
The Motor Platform supports the 24 RPM gear motor that turns a crank with a small pulley on the end of it. Onto this pulley is tied a length of fishing line that is connected to the Rocker Assembly that moves the Swing.
The Rocker Assembly is basically a reciprocating rocker that moves the Swing back and forth in a realistic manner.
The Swing is connected to the Rocker Assembly by its two ropes.
All three parts work together to make a very unique and whimsical addition to any yard haunt.
PART 1 ---The Swing and Skeleton.
(I recommend making the swing first, that way any size changes needed for the other assemblies can be made easily.)
1. Cut a 14-1/2 X 5" section of 3/4" thick wood. Drill a 1/2" hole about one inch from the left side, centered in the middle. Repeat this step on the right side of the swing board. Insert a length of brown sisal rope into each hole (from the top of the bd.) and tie a half knot on the bottom to hold it in place.
You can make you swing ropes any length you want, it depends how high off the ground you choose to mount the swing.
My ropes are 65" long each. Tie a loop at the top of each rope. Try to make sure both lengths of rope are even, or you'll end up with a crooked swing.
NOTE: When I first built my swinging skelly, I hung the swing from the eye bolts on the bottom of the swing supports. This caused a problem by giving the swing an extra pivot point, causing the swing to stop swinging consistently. I fixed this problem by mounting the tops of my swing ropes about 3" up from the bottom, back-side of the swing support with a screw and flat washer and then using some thin bailing wire to secure the rope (a few inches lower) onto the eye bolt. This fixed my problem. (See Picture)

The skeleton I used is about 3 feet tall. If you are using a bigger skeleton, you might need a larger swing board to mount it on. I used two long wood screws thru my skeleton's hips to mount him to the swing board. Make sure he is centered in the middle. I had to modify the skelly's arms at the shoulders and elbows by taking separating the joints and re-connecting them loosely with some bailing wire. This allowed me to position the hands on the swing ropes in a more natural looking pose. I then used fishing line to tie his hands to the swing ropes. (Before tying the hands on the ropes, I used my heat gun to soften the fingers and curl them around the rope for added realism.)
This completes the Swing for now.
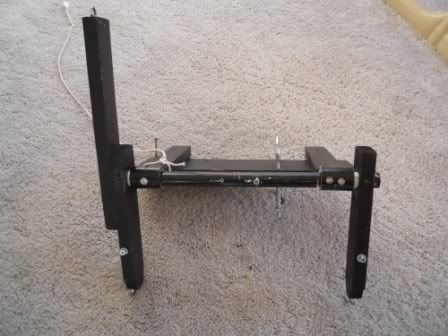
PART 2 ---Swing Rocker Assembly


Start with a section of 1 X 4" wood cut to 14-1/2" long. On the top of this board will be mounted a pair of 1 X 2" boards, cut to 6-1/2" each. Center each 1 X 2" piece on top of the 1 X 4 board at 2-1/4" from the edge. One end of each 1 X 2 will overlap the front edge of the horizontal flat board. Mount both 1 X 2s on top using #8 X 1-1/4" wood screws (two screws for each board), making sure the BACK end of each 1 X 2 overhangs about 3".
On the overhanging end of each of these 1 X2s we will attach a 3/4" PVC Straight Coupler. Drill a 1/8" hole all the way thru the center of each coupler. Then drill ONE of the holes on one side of each coupler a bit bigger--big enough so you can fit a screwdriver into and tighten the screw that will hold the coupler in place. Using a #8 X 3/4" wood screw for each coupler, fasten one coupler (horizontally) onto the end of each 1 X 2.

Cut two more sections of 1 X 2" wood, measuring 9" a piece. These two pieces will be our left and right Swing Supports. Measure 1-3/4" from one end on the flat side of each piece and drill a 7/8" diameter hole. This is where a 1/2" diameter PVC crossbar will be mounted into.
Cut a section of 1/2" PVC 14-1/4" in length. This will be our PVC crossbar. Insert the end of the PVC into the hole in the left side swing support. let it come thru out the other side about 1/4". Hold it in place and drill a 1/8" hole into the swing support and through the PVC. Screw in a #8 X 3/4" screw to hold the PVC in place.
Slide the free end of the PVC crossbar into the left side PVC coupler and thru the right side coupler. Slide the right side swing support onto the PVC crossbar until the end of the crossbar is flush with the outside edge of the right side swing support. Lay the whole assembly flat on a table to make the swing supports even and then drill a 1/8" hole into the right side support and PVC. Secure that side with another #8 X 3/4" screw.
Cut another section of 1 X2" wood measuring 11-1/2" long. This piece will be called the Rocker Arm and will be mounted flat on the outside of the right side swing support. Insert a small eye bolt into the top end of the rocker arm. (This is where the fishing line coming from the motor crank will hook on.) Measure 4-3/4" down from the top of the right side swing support and place the bottom end of the rocker arm (the end without the eye bolt) at this spot. Mount it there to the swing support using two #8 X 1-1/4" wood screws.
Insert a small eye bolt into the bottom end of each swing support.
NOTE: My swing ropes are 12-1/2" apart. The two eye bolts on my swing supports measure 13" apart. If your swing ropes are further apart than mine, you will have to increase the length of the PVC crossbar and the distance between your swing supports.
Measure up about 3" from the bottom of each swing support and drill a 1/8" hole on the rear side of each one. Screw in a #8 X 3/4" wood screw and flat washer to each hole. Don't tighten them all the way down yet. The very tops of the swing ropes will mount to these two screws.
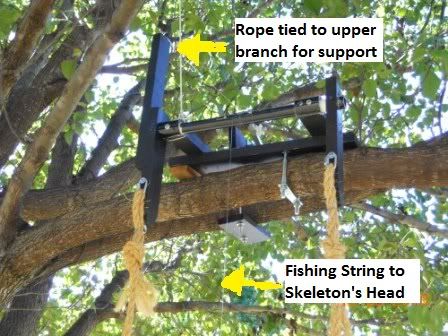
I drilled holes and used a large U-Bolt and nuts to mount the Swing Rocker Assembly to the tree limb. (See Pic) If your tree limb is too thick for a U-bolt, you can use a short piece of wood with 1/4" holes drilled in it and use 1/4" threaded rod sections and nuts to secure the assembly to the tree limb. Also, you can use some long wood screws thru the assembly into the tree limb to stabilize the whole thing.
IMPORTANT: One thing I had to do to keep the rocker arms from rubbing/binding on the PVC couplers, was to cut some "washers" out of some plastic milk jug material. (This plastic is very slippery against itself.) Insert two of these washers on each side of the rocker assembly (over the PVC crossbar), where the wooden rocker arm meets the PVC coupler. (See pic.) This will prevent many headaches down the road.

This completes the Swing Rocker assembly.


Look further in this thread for continuation of tutorial!
Anyway, here it is:
Animated Swinging Skeleton

VIDEO of PROP:
http://vidmg.photobucket.com/albums/v630/DaveNTracy/Swinging Skeleton/DSCN0546_zps1wcbq6hc.mp4
http://vidmg.photobucket.com/albums/v630/DaveNTracy/Swinging Skeleton/DSCN0547_zpsgyxgukzr.mp4
Parts List
A. SWING
(1) 14 1/2 X 5" piece of wood, 3/4 to 1" thick (or similar)
Sisal Rope (about 12 ft.)
(1) Skeleton (I used a 3 ft. child size skelly)
Fishing Line
(2) Long wood screws, 2 to 3 " long.
Bailing wire
B. SWING ROCKER
(1) Wood piece, 14 1/2" long.
(2) 1 X 2" wood pieces, 6 1/2" long each.
(6) #8 X 1 1/4" wood screws
(2) 3/4" PVC straight couplers
(6) #8 X 3/4" wood screws
(2) 9" long sections of 1 X 2" wood.
(1) 1/2" PVC section, about 14 1/4" long.
(1) 11 1/2" long section of 1 X2" wood.
(3) Small eye bolts
(2) #8 Flat Washers
(1) Large U-Bolt w/nuts (Or a 1/4" X 20 Threaded Rod and Nuts and a 6" long scrap wood piece.)
Thin Nylon Rope
C. MOTOR PLATFORM
(1) 24 RPM Gear Motor (or similar)
(1) AC/DC Power Adapter for Motor
(1) Wood board, measuring approx. 11 X 5 1/2"
Hardware to mount Motor to wood board. (Varies, depending on motor type-Bolts, Nuts, Lock Washers..)
(1) 4 inch section of 1/2 X 1/8" Flat Aluminum Stock for motor shaft.
(1) Small Pulley
Hardware to mount pulley to motor crank.
(1) 13 1/2" section of a 1 X 3" wood board.
(1) 13 1/2" section of a 1 X 2" wood board.
(4) #8 X 1 1/4" Wood Screws
(1) Large 1/4" diameter U-Bolt w/ nuts. (Or 1/4" X 20 threaded rod w/ nuts, washers and a 8" long piece of scrap wood.)
Thin Nylon Rope
Fishing Line
Theory of Operation
The way in which the swing works is fairly simple. The whole system consists of three different parts: The Motor Platform, the Rocker Assembly and the Swing itself (with the skeleton).
The Motor Platform supports the 24 RPM gear motor that turns a crank with a small pulley on the end of it. Onto this pulley is tied a length of fishing line that is connected to the Rocker Assembly that moves the Swing.
The Rocker Assembly is basically a reciprocating rocker that moves the Swing back and forth in a realistic manner.
The Swing is connected to the Rocker Assembly by its two ropes.
All three parts work together to make a very unique and whimsical addition to any yard haunt.
PART 1 ---The Swing and Skeleton.
(I recommend making the swing first, that way any size changes needed for the other assemblies can be made easily.)
1. Cut a 14-1/2 X 5" section of 3/4" thick wood. Drill a 1/2" hole about one inch from the left side, centered in the middle. Repeat this step on the right side of the swing board. Insert a length of brown sisal rope into each hole (from the top of the bd.) and tie a half knot on the bottom to hold it in place.
You can make you swing ropes any length you want, it depends how high off the ground you choose to mount the swing.
My ropes are 65" long each. Tie a loop at the top of each rope. Try to make sure both lengths of rope are even, or you'll end up with a crooked swing.
NOTE: When I first built my swinging skelly, I hung the swing from the eye bolts on the bottom of the swing supports. This caused a problem by giving the swing an extra pivot point, causing the swing to stop swinging consistently. I fixed this problem by mounting the tops of my swing ropes about 3" up from the bottom, back-side of the swing support with a screw and flat washer and then using some thin bailing wire to secure the rope (a few inches lower) onto the eye bolt. This fixed my problem. (See Picture)

The skeleton I used is about 3 feet tall. If you are using a bigger skeleton, you might need a larger swing board to mount it on. I used two long wood screws thru my skeleton's hips to mount him to the swing board. Make sure he is centered in the middle. I had to modify the skelly's arms at the shoulders and elbows by taking separating the joints and re-connecting them loosely with some bailing wire. This allowed me to position the hands on the swing ropes in a more natural looking pose. I then used fishing line to tie his hands to the swing ropes. (Before tying the hands on the ropes, I used my heat gun to soften the fingers and curl them around the rope for added realism.)
This completes the Swing for now.
PART 2 ---Swing Rocker Assembly


Start with a section of 1 X 4" wood cut to 14-1/2" long. On the top of this board will be mounted a pair of 1 X 2" boards, cut to 6-1/2" each. Center each 1 X 2" piece on top of the 1 X 4 board at 2-1/4" from the edge. One end of each 1 X 2 will overlap the front edge of the horizontal flat board. Mount both 1 X 2s on top using #8 X 1-1/4" wood screws (two screws for each board), making sure the BACK end of each 1 X 2 overhangs about 3".
On the overhanging end of each of these 1 X2s we will attach a 3/4" PVC Straight Coupler. Drill a 1/8" hole all the way thru the center of each coupler. Then drill ONE of the holes on one side of each coupler a bit bigger--big enough so you can fit a screwdriver into and tighten the screw that will hold the coupler in place. Using a #8 X 3/4" wood screw for each coupler, fasten one coupler (horizontally) onto the end of each 1 X 2.

Cut two more sections of 1 X 2" wood, measuring 9" a piece. These two pieces will be our left and right Swing Supports. Measure 1-3/4" from one end on the flat side of each piece and drill a 7/8" diameter hole. This is where a 1/2" diameter PVC crossbar will be mounted into.
Cut a section of 1/2" PVC 14-1/4" in length. This will be our PVC crossbar. Insert the end of the PVC into the hole in the left side swing support. let it come thru out the other side about 1/4". Hold it in place and drill a 1/8" hole into the swing support and through the PVC. Screw in a #8 X 3/4" screw to hold the PVC in place.
Slide the free end of the PVC crossbar into the left side PVC coupler and thru the right side coupler. Slide the right side swing support onto the PVC crossbar until the end of the crossbar is flush with the outside edge of the right side swing support. Lay the whole assembly flat on a table to make the swing supports even and then drill a 1/8" hole into the right side support and PVC. Secure that side with another #8 X 3/4" screw.
Cut another section of 1 X2" wood measuring 11-1/2" long. This piece will be called the Rocker Arm and will be mounted flat on the outside of the right side swing support. Insert a small eye bolt into the top end of the rocker arm. (This is where the fishing line coming from the motor crank will hook on.) Measure 4-3/4" down from the top of the right side swing support and place the bottom end of the rocker arm (the end without the eye bolt) at this spot. Mount it there to the swing support using two #8 X 1-1/4" wood screws.
Insert a small eye bolt into the bottom end of each swing support.
NOTE: My swing ropes are 12-1/2" apart. The two eye bolts on my swing supports measure 13" apart. If your swing ropes are further apart than mine, you will have to increase the length of the PVC crossbar and the distance between your swing supports.
Measure up about 3" from the bottom of each swing support and drill a 1/8" hole on the rear side of each one. Screw in a #8 X 3/4" wood screw and flat washer to each hole. Don't tighten them all the way down yet. The very tops of the swing ropes will mount to these two screws.
I drilled holes and used a large U-Bolt and nuts to mount the Swing Rocker Assembly to the tree limb. (See Pic) If your tree limb is too thick for a U-bolt, you can use a short piece of wood with 1/4" holes drilled in it and use 1/4" threaded rod sections and nuts to secure the assembly to the tree limb. Also, you can use some long wood screws thru the assembly into the tree limb to stabilize the whole thing.
IMPORTANT: One thing I had to do to keep the rocker arms from rubbing/binding on the PVC couplers, was to cut some "washers" out of some plastic milk jug material. (This plastic is very slippery against itself.) Insert two of these washers on each side of the rocker assembly (over the PVC crossbar), where the wooden rocker arm meets the PVC coupler. (See pic.) This will prevent many headaches down the road.

This completes the Swing Rocker assembly.


Look further in this thread for continuation of tutorial!


