Halloween Forum banner
281 - 300 of 361 Posts


I was thinking of turning my non lit zombie barrel into a chiller and then have pvc piping coming out at a T to cover one side of the walkway inside my fence. Then drilling some holes for the fog to escape. But I have heard wind plays a huge factor. It's late in the game so I might just hold off until next year, reason I'm even considering it is the weather has been nice where I live and that is not always the case here.
 
View attachment 509474

I was thinking of turning my non lit zombie barrel into a chiller and then have pvc piping coming out at a T to cover one side of the walkway inside my fence. Then drilling some holes for the fog to escape. But I have heard wind plays a huge factor. It's late in the game so I might just hold off until next year, reason I'm even considering it is the weather has been nice where I live and that is not always the case here.
Wind is always a killer for fog which is why we're not doing any. It is so windy here all the time that the animated ghost that we have in our graveyard that we had planned to rig a fan to blow around... it doesn't need a fan. In fact, the wind has blown it over and now needs 100lbs of weight to keep it upright. Outdoor fog will probably always be impossible here because of the wind.
 
I tried running the fogger into each pipe tonight to compare results and sending it in the pipe that goes up through the ice to the top and out via the short pipe at the bottom of the can worked better for me. This is how CraiginPA described his connection above. The fog stayed lower and it kept seeping out the outlet pipe between run cycles.

When i tried it the other way the fog would not stay as low, It didn't seem to have the volume as the other way probably because it was dispersing quicker. It would also back out of the inlet pipe between run cycles rather than seep out of the outlet pipe.

I want to add a fan to improve the distance and seal the lid better, there was some seepage there. It was a good trial run to see what would work best before the big night.
 
The colder you can get your fog, the lower and slower it will be. Heat rises, so running your tubing down hill means that the resulting fog will be colder than fog going the other way. I have a little Kenmore fan that I got at K-Mart for about $10 that works great for blowing fog, but it is going to speed things up and make it dissipate faster, fair warning. If you do it, you'll want the fan at the entry to the chiller, not the exit, which will just chop up the fog and ruin the effect.
 
@Cephus404: titleist1 was referring to my modification to the classic vortex chiller, outlined in post #274 of this thread (on page 28), where I ran the fog up to the top, had it seep through the ice, and then exit the bottom. To assist the fogger, I used a computer fan at the top of the input to create a positive pressure zone there, and a negative pressure in the input pipe.
 
I have a Chauvet Hurricane 1800 Flex. Does any one know if WOLFPACK's fog chiller will work OK with this machine? Or should I make it bigger?

PS: I went to page 17 where WolfPack posted his pictures, the pics are wonderful but the attachments are no longer valid. Could someone repost his instruction on how to build this cool vortex fog chiller, please?
 
Wolfpack's design should work for you, even though you've got a bigger fogger than his original design spec. Note that Wolfpack uses pelletized dry ice to cool his fog. If you are going to use regular ice cubes, you'll want to make the stand for the ice shorter than the 16" he uses, in order to get more ice volume. I use 12" high, but you might even be able to go to 8" or 10" in order to get even more ice in. At a 12" height, I can fit 66 pounds of ice in. Titleist1 reports 80 pounds at 10". Since regular ice will melt faster than pelletized dry ice (which technically dissipates), you want as much as you can get in there in order to avoid refilling the can during the big night.

You may also find that running the fog into the chiller through the long curved pipe that goes to the top of the can will work better for you with regular ice cubes. The reasons for this are noted in posts numbers 274 and 278, located on page 28, and confirmed by titleist1 in post 283 on this page.

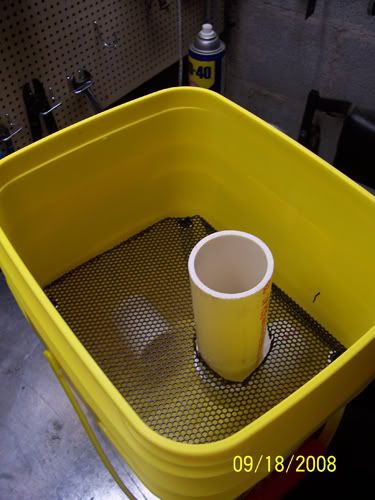
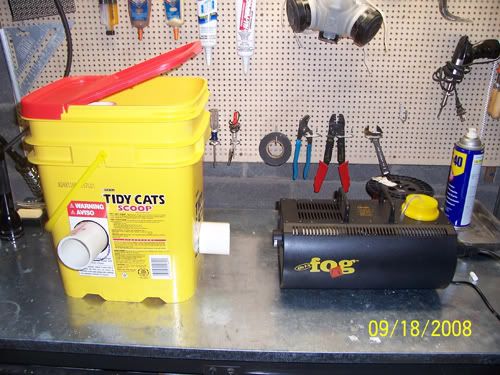
The parts needed for this are a 32 gallon trashcan (I bought mine at Wal-Mart for $9.98), about 4' of 3" PVC cut into a foot long piece (output), a foot long piece (input), and a 2' piece (vertical), a 90 degree 3" pvc bend, about 7' of 1/2" pvc cut into 4 legs (mine are 12") and 4 pieces that make up the top (measure where the top will sit in the can, subtract 3", divide by 2 to get the length), a 4 way 1/2" pvc connector, 4 90 degree 1/2" pvc connectors, a piece of screen with holes smaller than your ice (I found a 2' x 5' roll of 1/2" square opening small animal fence in the fencing department), 8 wire ties (holds the fence to the pvc stand), some 1/2" door insulation with an adhesive side (to make the lid fit tighter), a bungee cord (to hold the lid tight against the insulation), and duct tape (to seal the input and output pipes). If you don't have all the parts laying around, you're likely looking at around $45 to build this. Once I had the raw materials, it took less than 30 minutes to cut and assemble. You'll want to put a new blade in your box cutter before you try to tackle the trash can cuts, unless you are lucky enough to have a hole saw the correct size for the 3" pipe exterior diameter. You'll also want to cut your fencing to a 2' square, and bend it into find the correct diameter in the can, which will likely be slightly larger than your stand. I didn't bother gluing any of the pvc joints. The stand joints will stay together with the pressure of the ice forcing them together. The 3" pvc joints have no pressure on them at all, so they won't fall apart.
 
That is some good instruction CraigInPA, and some very helpful tips too. I just finished shopping for supply. Did the price go up since you finished yours? :) My total adds up to about $60.

I got everything you suggested except for one item. I'm not sure what kind of insulation you're talking about. Is it the long round plumbing insulation or the flat insulation for doors and windows? I'm also wondering about the melted ice on the bottom of the trash can. Do you have to drill holes on the bottom to drain? Aso, is the clearance space between the top of the vertical tube and the bottom of the lid 2" or 3"? Thanks in advance, CraigInPA.

Edit: My bad. I read your post again and you did mention it's 1/2" door insulation. So I got a roll of 1/2" wide x 5/16" thick x 10' long weatherstrip seal for doors and windows at Walmart for $6.96. :)

I also got a gallon of Bog Fog juice. Have you tried this juice?
 
When I built mine, I didn't have to buy the large pipe or any of the pipe fittings because I had them in my scraps pile. At a $60 build cost, this is still a pretty cheap prop part (especially since it will basically last forever). The insulation you got is the correct stuff. I put a pair of 1/2" holes in the bottom of the can. I used 4" as the top distance because, on the top of the up-pipe I put a floor flange with a fan taped into it, which added 2" of additional height, so I'm about 2" from the top rim of the trash can. I'm not sure that there's a any difference between a gap of 2" or 3" from the top if you're piping the hot fog to the top (my method), but there may be a difference if you're piping the cold fog down from the top (wolfpack's method).

I've never used Bog Fog. I've used the Chauvet fog juice, Froggy's Freezin' Fog, and Froggy's Swamp Juice. The Froggy's products produced significantly better fog than the Chauvet juice. Froggy's recommends Freezin' Fog for outdoor use, so that's what I've been using for the last few years.
 
Are you an engineer, CraigInPA? You really take everything and turn it a notch higher. I like the idea of the top flange with the fan attaches to it. How did it turn out for you?

Before I bought a gallon of Bog Fog, I did a little research. Both Bog Fog and Freezin Fog are made by the same company. Base on the reviewers from Amazon, people seem to like Bog Fog juice more (more people buying and higher rating). But most of people here use Freein Fog for their fog chilling devices.


Edit: I found this info from the seller who sells Freezin Fog.

Bog Fog is an extremely dense fog made for white out conditions.
The Freezin fog was designed to work great through a chiller thus creating an amazing low lying, ground fog.
So now I know the difference between the two. :)
 
The fog coming out of the fogger will still be hot, causing it to rise even in 40 degree weather. Running it through the chiller gets it into the 30's. With 40 degree air temp, no wind, and chilled fog, you'll have an awesome low lying fog!
 
Yea, I live in Wisconsin and it was in the upper 30s during my ToT last night, but I still ran my fog machine through my chiller. Since the fog and the air temp was roughly the same I didn't get that nice ground affect I wanted. You need that air temp to be at least in the 50's in my opinion. I think the bigger the variance between the air temp and the fog temp, the better the ground fog will be. I could have ran my fog through all the ice in the world, and I still wouldn't get my fog output cold enough to achieve nice ground fog when the air temp is just above freezing. I've notice when people post awesome ground fog pics/videos on this site, they are all from warm locations (North Carolina, Texas, etc..). Those are ideal locations to achieve that type of fog this time of the year. Especially when there's no wind.

However, the night wasn't a total loss, I still had some awesome fog coverage throughout my graveyard. The fog itself didn't stay low to the ground, but rather spread about 15 feet in the air. At times it was so thick I couldn't see the sidewalk when I was standing by my garage. I had to cut it back at times when the little kids were approaching. However, when older kids were approaching, it was full on. :D

I've attached some pics of my setup, and the fog coverage last night. As you can see I put a fan next to my output and that really projected the fog out into my yard. That made a huge difference! All in all I was very pleased with the results. This was my first time using this type of chiller, and even though I was hoping for the low laying fog...this was very satisfying. On a side note....damn does that 1301 Chauvet kick out some serious fog...unreal!
 

Attachments

In my community, ToTers get "two bites at the apple".

The first is following the children's Halloween party, which is always held on a Saturday. About a half dozen homes turn it all on for the kids who don't live in the community full time (my community is 50% vacation homes). The weather was windy, with a stiff 10mph breeze and gusts to 15mph, with an air temp of 50. My fog slithered out of the chiller, went about 2 feet, and was dissipated almost immediately. Attempts to get a video of it were a total failure. We had a dozen kids stop by and get candy.

On Halloween day, the wind was howling. 20mph winds most of the day. As the sun set, they decreased to 5mph, and the temperature dropped to 40. The fog slithered out of the chiller, and went maybe 5 feet before it got blown around the graveyard. Fortunately, the fog stayed pretty much intact, but it was moving wherever the wind pushed it about 4 feet off the ground. The ToTers walking down the driveway loved the fog blowing by them, but I was less than thrilled that the wind wouldn't stop long enough for me to video the fog chiller's performance. We had about 80 ToTers collect candy, and QUITE a lot of adults who came over "just to see the display".

Things I learned from actually running the chiller two nights:
1. 66 pounds of ice is WAY more than is needed for 3 hours of fogging.
2. My reverse-reverse chiller with a helper fan (blows the hot fog into the top of the can, where it goes down through the ice) works really well except that the fog hits the trash can lid and is forced to the outside. That means the ice around the edge of the can melts faster than the center. At the end of the first night, the ice was down to about 4" thick on the edge and a solid block 12" thick in the middle. The second night, I mounded the ice around the edge of the can and had less in the center. At the end of the night, the edge was down a little from the center, but not by much.
3. A Chauvet H1301 on continuous fog goes through a gallon of juice in about 4 hours. I wasn't prepared for that amount, so I had to use Chauvet's juice for the last 2 hours. Freezin' Fog stayed visibly lower than Chauvet's, even though they both rose due to the wind. Chauvet's also had an odor, not unpleasant, whereas Froggy's did not.
 
Thanks to everyone for contributing to this forum. I was able to build a pretty successful vortex fog chiller for my haunt this year. Thought I’d share a couple of things I learned along the way for anyone else looking to build one from scratch..

Despite what I’ve read from most posters around the internet on these chillers, I found my fog chiller worked best in reverse. That is, hot fog goes into the pipe which turns 90 degrees towards the roof of the chiller. Settles through the dry ice, then exits the small pipe near the base (normally the inlet pipe). This provided me with the best results. I found when I ran the chiller in “normal” mode through the Y connector, I was getting a lot of back flow. So I switched it around and poof, worked much better.

I also use a simple 1000W spirit fogger as I can’t justify the cost for a more expensive one currently. To compensate for a smaller fogger, I used a 36L garbage can vs the larger Brute cans shown in many tutorials with Chauvet foggers. Although this produced less over fog as the off cycle time is longer, I used 30lbs of dry ice to extend the hang time of the fog.

Dry ice is superior for many reasons. Since it sublimates into mist instead of melting it will not pool into liquid at the bottom of your chiller reducing its effectiveness. It’s -78 degrees Celsius (-109 Fahrenheit) so it should have a much greater cooling effect on your fog. It also cooled not just the metal grate my ice rested on, but the entire lower half of my can. I think this contributed to the over cooling effect to the fog.

Unfortunately I do not have access to high quality fog juice, as such was forced to use lessor quality brand. Although I had a decent effect, I can’t help but think I would have been much better using higher quality juice.
Image
Image


Sent from my iPhone using Tapatalk Pro
I've thought about trying dry ice as well, but a) I use a bigger (55 gal?) can for my cooling, and b) assumed ice would be cheaper. What form was your dry ice in pellets, chunks, or blocks? If blocks, I assume you smashed it up before using it?
 
Fortunately Praxair, the company I bought my dry ice from, sold it in pellets, which were about the size of regular ice cubes. So very little work on my end prepping it for use.

There was also a sale on during Halloween. It was sold at 0.70/lb CDN. So $20 to fill my chiller for the night was reasonable.


Sent from my iPhone using Tapatalk Pro
 
The ice melts because the fog comes out of the machine hot, not because of the ambient air around the chiller. Unless the environment where you're going to put the chiller is over 70 or 80 degrees, it's not likely that you'd save any appreciable amount of ice in the 4-5 hours you might be running this on Halloween night using an insulated cooler versus a cheap trash can from wal-mart.
 
281 - 300 of 361 Posts