Halloween Forum banner
241 - 260 of 361 Posts
It worked fairly well, but I think that there is a lot to be said for shooting the fog UP the pipe on the other models and then letting it settle down through the ice before it comes out... as opposed to mine, where I'm shooting it in at the top and having it come out the bottom. I think that having that extra little bit of time for the fog and air to mix, expand, and cool would have made a noticeable difference. It didn't help that last night, there was a small breeze and it was fairly cold air temps. I was happy with my results, but I think it could have been better. I received a lot of complements and questions on how I got it to stay lower though.
 
My approach - used a large trash can, 4" PVC and some cementboard with holes drilled in it for the ice shelf, then added some wire afterward to help keep some of the ice chunks off the shelf and out of the holes. I can see how the shelf might help hold the fog in the cold area next to the ice a little longer, but I do worry that it is overly restricting the flow. I wasn't getting good flow last night, but again I was just using a 700w fogger with this big chiller...

 
I just completed my initial build over the weekend! I pretty much used WOLFPACK7483's exact build recommendation (3" PVC for intake/output, Brute trash can, 1/2" PVC for stand) and am also using a Chauvet 1301 and Froggy's Freezin' Fog. A couple slight differences:
  • I'm using traditional ice instead of dry ice. With the 16" height on the stand, it took 40 pounds of store bought ice to fill the chiller to the preferred level (basically 2" from the top of the can) - this was about $10 worth of ice in my area
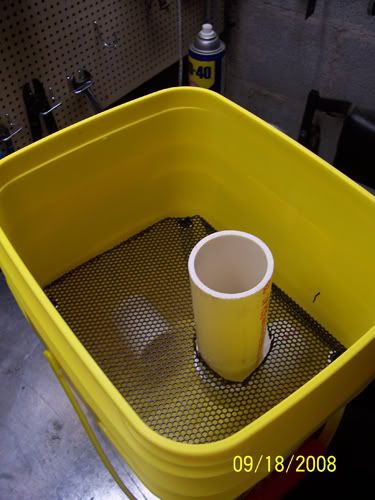
  • I used 1/4" wire mesh for the top of my stand to hold the traditional ice - it worked wonderfully
  • Not sure if anyone else did this, but I did seal the outside of all intakes/outputs with some flexible bathroom caulking and had zero leakage around the PVC
  • I drilled six separate 1/4" holes in the bottom of the can for water drainage. Good news - zero fog escaped through these and water was able to move freely out of the bottom
Image

Image

Image

The initial build as outlined above worked wonderfully compared to other chillers I've tried (drainage pipe with frozen water bottles, trash bag over output with ice in it). The 1301 is still a beast though, so it pushed the fog almost instantaneously through the densely packed ice. I noticed a lot more lift/dispersion to the fog during the initial burst, which I believe is due to the standard ice being warmer than dry ice. I think with a few adjustments the fog will chill much nicer and stay lower more consistently. I'm going to make the following adjustments to the build and see if it does the trick:
  • Lower the stand table from 16" to 8-10" hhigh. This should allow significantly more ice to fit in, further cooling the fog during initial bursts
  • Sealing the lid: As people mentioned, it is easy to get leakage around the lid, so I'll try getting some foam and bungees as ReelSore and others recommended
  • Cosmetic upgrade: The complete build ain't pretty as-is, so I'm planning to at least paint the whole thing a dark gray or black
I doubt I'll get to it this year, but my ideal build would be to go with something like this, maybe with some skeleton arms or a head coming out of the top. Then just drill a couple of small holes on the top of the lid so some light fog comes off the top, and we got ourselves a winner
Image
Alright, I'm now convinced on this method. My current fog chiller (which didn't work too well) was designed the exact opposite. I shot the fog from a 1301 at the bottom of the chller UP through the PVC pipe where it dispersed on top of the ice. Then - I was hoping- the fog would trickle DOWN naturaly through the ice as it cooled, and exit out the bottom. I guess I had it backwards.

However, I never would have thought to do it via the other method (Wolfpack's and Danimal's). Where you shoot the fog into the bottom of the chiller and have it trickle UP through the ice...only to have it cascade DOWN and out through the PVC pipe.

I have a hard time thinking of the science behind this though. When the fog hits the ice from the bottom, what is making it continue to rising though the layer of ice (which looks likes the ice chamber is a good 10 inches think)? I always figured that when the fog gets cold it will get dense and fall...not continue rising!?!?!? However, looking at these videos, it's hard to argue against the results. Maybe the force at which the fog machine is pump out the fog, is it FORCING the fog UP through the ice? It must be.
I completely agree - it seems really counter intuitive to think it would work better this way. Once I get a 1301 I plan to test it both ways. Maybe the fog spends more time in the chiller in contact with ice since it has to be "pushed up", or, it stays in there until the whole chiller is full of fog and has nowhere else to go?
 
SCIENCE! LOOK OUT!

The expansion of fog into the chiller pushes the flow up through the ice. Since the fogger is forcing the flow of air, the top of the can is the only direction for the fog to move, to relieve internal air pressure and equalize with atmospheric pressure.

Which is the key here.

You're relying on the physical nature of air pressure, which is to equalize. Same as a precipitate in a solution, to equalize its ratio throughout the container it is trapped in. (Until the point of supersaturation which then you have condensation and the bottom of the container has stuff settling, of course!)

Example: if you use a window fan, you can do two things. Either you can force outside air into the house, or force house air outside. In both cases, there is a change in pressure. You are either increasing the pressure inside the house in relation to atmospheric pressure, or the reverse. But it is the difference in pressure, that causes flow, in ANY direction.

Now that the science is outta the way, I can give you guys a recommendation. Go get one of these puppies!


http://www.homedepot.com/p/Inductor-4-in-In-Line-Duct-Fan-DB204/100073963


For the weaker fog machines, these fans help wonderfully. Here's why. The expansion of fog is a positive-pressure change, inside your chiller. However, only for as long as the fogger is pumping fog! Once these weaker fog machines run out of heat and have to cycle off, that re-heating phase is no longer keeping a positive pressure and forcing air into the chiller. That lets the fog stop flowing, and you have a static system. No. Mo. Flo.

So if you install one of these inline duct fans right after the fogger before the cooling chamber of the chiller, it keeps the air flowing! The fan, not the fogger, is the source of positive air pressure change inside the chiller. Even if the fogger stops, you're moving fog through the chiller.

It's a $30 fix, along with some foil tape. It even helps when you have a super-duper 1300-watt fogger. I want to state, that I have not tried using just a simple computer chassis fan, which if you find one with a significant CFM rating, could probably do the same job, with low voltage. I went with this duct fan, because they can handle dust and debris and are reasonably robust. If you have an old computer, and can gut it for the chassis fans, then by all means go for it. Free is best!

Let me know if this improves performance on your system.
 
SCIENCE! LOOK OUT!

The expansion of fog into the chiller pushes the flow up through the ice. Since the fogger is forcing the flow of air, the top of the can is the only direction for the fog to move, to relieve internal air pressure and equalize with atmospheric pressure.

Which is the key here.

You're relying on the physical nature of air pressure, which is to equalize. Same as a precipitate in a solution, to equalize its ratio throughout the container it is trapped in. (Until the point of supersaturation which then you have condensation and the bottom of the container has stuff settling, of course!)

Example: if you use a window fan, you can do two things. Either you can force outside air into the house, or force house air outside. In both cases, there is a change in pressure. You are either increasing the pressure inside the house in relation to atmospheric pressure, or the reverse. But it is the difference in pressure, that causes flow, in ANY direction.

Now that the science is outta the way, I can give you guys a recommendation. Go get one of these puppies!

View attachment 380761

http://www.homedepot.com/p/Inductor-4-in-In-Line-Duct-Fan-DB204/100073963


For the weaker fog machines, these fans help wonderfully. Here's why. The expansion of fog is a positive-pressure change, inside your chiller. However, only for as long as the fogger is pumping fog! Once these weaker fog machines run out of heat and have to cycle off, that re-heating phase is no longer keeping a positive pressure and forcing air into the chiller. That lets the fog stop flowing, and you have a static system. No. Mo. Flo.

So if you install one of these inline duct fans right after the fogger before the cooling chamber of the chiller, it keeps the air flowing! The fan, not the fogger, is the source of positive air pressure change inside the chiller. Even if the fogger stops, you're moving fog through the chiller.

It's a $30 fix, along with some foil tape. It even helps when you have a super-duper 1300-watt fogger. I want to state, that I have not tried using just a simple computer chassis fan, which if you find one with a significant CFM rating, could probably do the same job, with low voltage. I went with this duct fan, because they can handle dust and debris and are reasonably robust. If you have an old computer, and can gut it for the chassis fans, then by all means go for it. Free is best!

Let me know if this improves performance on your system.
This is interesting.

I had pretty good results with my chiller this last Halloween. I used the same design as Wolfpack with some modifications. The inlet pipe was about 3ft. long and I used the Y-adapter. I also put a trash bag on the end which spread out the fog. I put the mesh about 10 inches from the bottom of the can which gave me enough space for four 20lb. bags of ice. It was pretty warm but unfortunately a little breezy so the fog didn't stay for long.

The only problem I had was getting the fog to spread out across my yard. It only went about halfway which is maybe 20ft or so. I suppose the bag contributed to this by spreading it out wide instead of deep. I would think putting this fan on the output side of the chiller after it hits the ice and comes down the pipe would be better because it wouldn't force the fog through so quickly. It seems it would help push the fog out across the yard better too.

The other issue is the 1301 doesn't stay running for long either before it recycles, but this has been discussed before. I did use the timer and had it run every 2 to 3 minutes. I'm happy how it worked, but would like to see if the fan would help push it along better. I think I'll try one of these. Would be nice if they had a 3 inch model though.
 
I made the kitty litter version tonight to be used this saturday for our party and it worked very well. while browsing in Lowes I found aluminum screen used to keep debris out of gutters to hold the ice , $2.30 for a 3' piece and $6 for a four 2" fittings is my only investment. The bucket is wider than the screen so I cut a second piece from the leftover screen and overlapped it to make up the width. Using the same chavet 700 machine the fog was way more impressive than previously. Thanks for the tutorial! :D
 
Froggy's Fog Vortex fog chillers "Blizzard and Polar"

Hi Guys,

Went to Froggy's website and noticed they have 2 fog chillers that look exactly like the one made by Wolfpak as well as me and others. The one named "Blizzard" looks to be a little smaller says it can hold 36lbs of ice. The "Polar" looks about the same size as the one here that holds about 80lbs of ice. Just wondering if anybody has seen one up close. There is a video on Youtube of the "Blizzard" in action.

Has anyone tried these Volumizer Crystals that they sell that lowers the fog mixture temperature to 14 degrees colder? Is this just salt?
 
JT5298, great job on your build. I've been thinking about trying some of the volumizer crystals but can't seem to find any reviews on the stuff.
When I used the pellet dry ice from my workplace, it performed great. Tried some block sheets of dry ice which I broke up from our local Harris Teeter
last year and was pretty disappointed.
that is not good to hear. I am planning on using dry ice this year and just breaking it up . do you have a video of the difference between the two types?
 
Some pics from our "CLOVER Ct. CHAOS" haunt last year. These are some of the front yard testing pics.
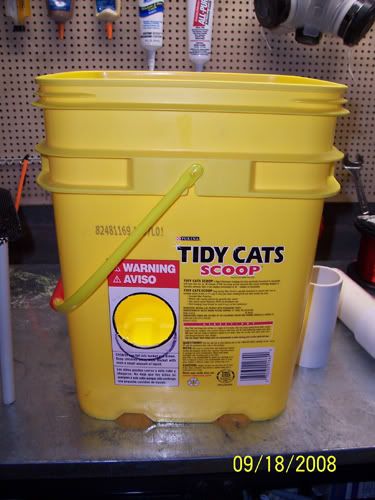
Made from a brute trash can, a little wire mesh, some pvc fittings and a chavuet 1301 fogger.
View attachment 282405 View attachment 282406 View attachment 282407
I purchased basically the same materials from Lowes the other day (however I went with a different brand of garbage can). This will be my weekend project, to try and replicate the same fog output. Also, I'm going to play around with lid and try seal if off so nothing is leaking out the top. I have a few rolls of those sticky foam strips I'll lay around the top so when the lid snaps in place it should give it a good seal. We'll see.

I'll probably just fill the top compartment with a few bags of ice from the gas station. I don't easily have access to a ton of dry ice, so hopefully this will suffice.

Thanks for the idea and wish me luck.
 
Here's a question for fog chillers…

Last year I went to a local group that showed how to build fog chillers in various configurations. All of these chillers used a flexible corrugated pipe to route the fog through the chiller. Most (if not all) designs were built to allow the water to drain away from the ice, which surrounded the pipe.

My question: Wouldn't you get a better thermal conduction if you had ice water around the pipes instead of just ice?
 
Hi guys, I read this from the Youtube video of the "Blizzard" fog chiller from Froggy's Fog.

"Can it be used with dry ice as well?"
The VEST(tm) system relies on the creation of real fog, not just cooling of the hot smoke from the fog machine. Therefor the ice itself is critical to the creation of the ultimate product, so dry ice would not add to the effect. It would also be incredibly expensive compared to the ice cubes, even if it would have added something. Water based ice cubes work perfectly in all Vortex low-fog generators.

I know Wolfpack used dry ice pellets in the video and it was incredible! Have you tried just regular ice and compared the difference. I used 4 20lb bags of ice last year. My shelf was lower than Wolfpack's, mine was about 10 inches high. The results were good but not anything like the video. I also used a 3 foot inlet pipe with a Y adapter and the outlet pipe was about the same length with a trash bag on the end. I think this year I will raise the shelf a little because it may have too much ice in it. I also want to keep the inlet and outlet pipe as short as possible like the video. I thought the longer pipe would chill the fog more but I think it limited the output. The fog was dense and low but did not spread far like the video.
 
I purchased basically the same materials from Lowes the other day (however I went with a different brand of garbage can). This will be my weekend project, to try and replicate the same fog output. Also, I'm going to play around with lid and try seal if off so nothing is leaking out the top. I have a few rolls of those sticky foam strips I'll lay around the top so when the lid snaps in place it should give it a good seal. We'll see.

I'll probably just fill the top compartment with a few bags of ice from the gas station. I don't easily have access to a ton of dry ice, so hopefully this will suffice.

Thanks for the idea and wish me luck.
I used the foam insulation tape on the one I made last year. It still let fog out the top. I solved this really easily by laying a trash bag over the top of the garbage can and then putting the lid on top of it. So that the bag is sandwiched between the lid and the insulation tape.
 
Frost King 1/2-in x 6-ft Foam Plumbing Tubular Pipe Insulation
Item # 24421 Model # P10XB/6


This worked great around the top rim of the can. No leaks at all, you can bend it around to the shape of the can.And a cheap fix. About a dollar.
 
I used the foam insulation tape on the one I made last year. It still let fog out the top. I solved this really easily by laying a trash bag over the top of the garbage can and then putting the lid on top of it. So that the bag is sandwiched between the lid and the insulation tape.
That's a good idea. That will be my Plan B if my 3/4 inch foam tape fails me. I built my chiller over the weekend, but I haven't tested it out yet. I wanted all the caulking and sealants to settled in before blasting it with hot steam.

Thanks!
 
Got a question here, and I'm seeing differing opinions all over the internet.

Apparently in the original design (with the short pipe as the inlet) about the bottom 2/3 of the chiller is left open as an expansion chamber for the incoming fog. Have I got that right?

Now if you do a reverse set up (with the short pipe as the outlet) would that change? Would you then need the TOP 2/3 to be open?

What if I made each section equal, regardless of inlet - 1/3 open at the top, 1/3 ice, 1/3 open at the bottom?

Any thoughts or advice are greatly appreciated.
 
241 - 260 of 361 Posts