Halloween Forum banner

Build Your Own "Vortex Fusion" Chiller

3 reading
326K views 360 replies 129 participants last post by  djjerme  
#1 ·
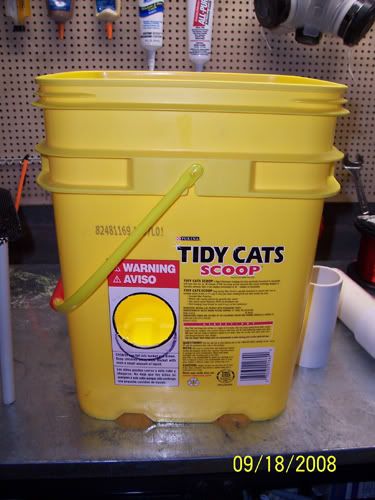
Lets build a chiller that follows the same design principles as the Vortex Fusion model using a Tidy Cats litter pail.
Sorry in advance for not providing measurements as I eyed up everything.
Though you will get the idea by looking at the pictures.

Some guidlines about this design are:
1. Keep the ice at about a 1/3 of the way down the pail so the fog has room to expand up through the ice.
(not to mention that you might get blowback if there is too much ice and the fogger you are using isn't powerfull enough to "push" through the ice)

2. Keep the downpipe at around an inch from the lid. Just enough room for the fog to move down it.

3. Fill the ice tray to the very top of the downpipe and try and use loose cubes.

4. Add some salt to your ice and see if you can get that stuff "colder". :)

Parts:

Tidy Cats Litter Pail as pictured
Few ft of 2 in. PVC or ABS pipe
2 in. PVC Elbow
Few ft of 1/2 in. PVC pipe

Some sort of metal mesh or chicken wire to hold ice
Epoxy of your choice (I used Oatey Epoxy Putty)
Krylon Fusion Paint (optional)
Nozzle for Drain Hose (optional)
Drain Hose (optional)
Tools for cutting the materials

Fog Intake hole:

Image


Fog Output Hole:
Image


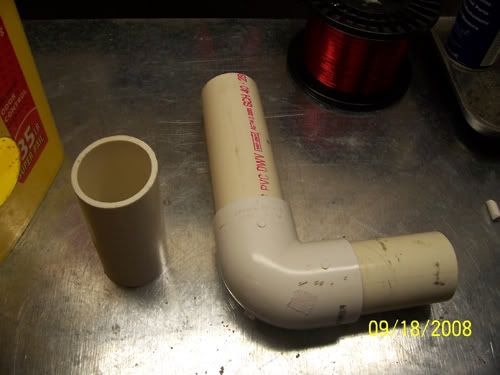
All the 2 in. PVC cut and assembled:
Image


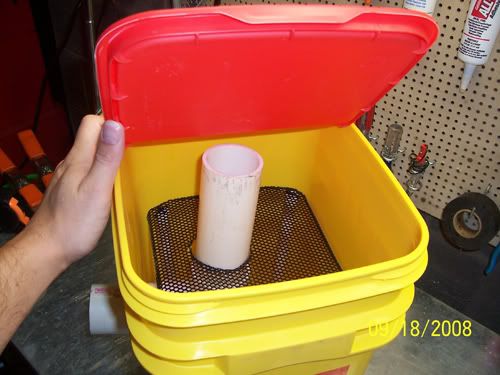
Here is the cage I constructed to hold the ice. I cut the steel to fit about 1/3 of the way into the pail. Then I cut the 1/2in. PVC for legs. I drilled holes into the top of the pipe and used cable ties to mount the legs onto the grate.
Image


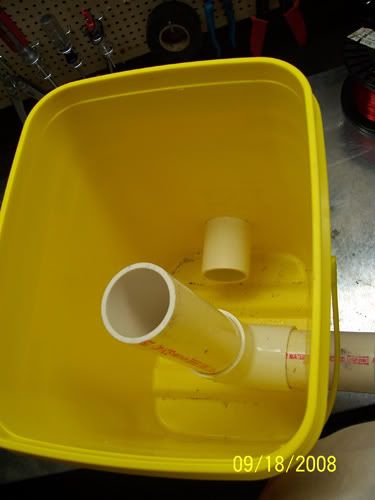
Test fit the 2in PVC pipes:
Image


Image


Test fit the grate with the 2in PVC pipes:
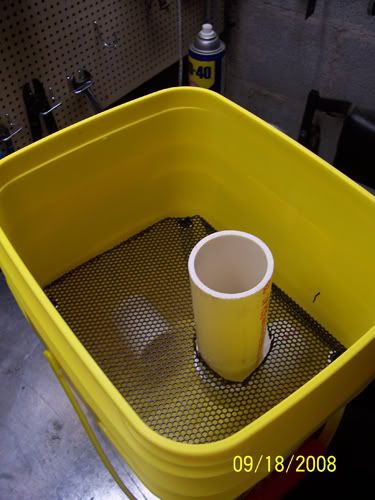
Image


Test the input hole height with my 400watt fogger:
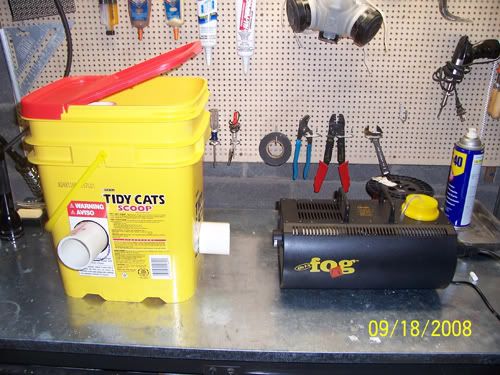
Image
 
#2 ·
Check the gap of the output pipe to the lid. You want around an 1inch:
Image


Image


I used Epoxy Putty to hold the pipes into place. That stuff hardens like steel.
If this is a temporary build, you could just use plumbers putty.
Image


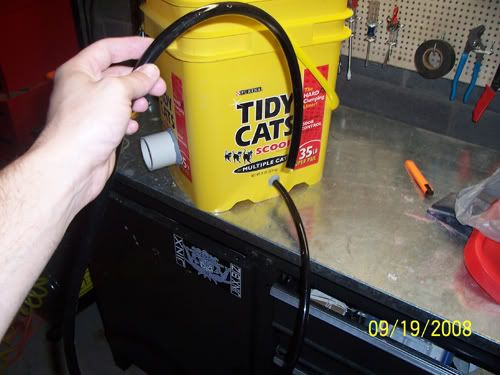
Here is a shot of my drain plug setup. This is optional but I will need it since I'll be using it mostly indoors.
Image


The drain plug with the hose attached:
Image


More to come as I did actually test this but didn't get a video just yet. I painted it tonight and will add a few more coats, then I will post a video of my results.

I will say that this design works perfectly.
You can shoot fog into either pipe and it will come out chilled.
I got near same results as my garbage can chiller with 16ft of dryer duct and 80lbs of ice.

This design uses less then 1 bag of ice and near the same results! :D
 
#3 ·
Good how-to, thanks! I have one of those old Lite F/X 1741 foggers, too. I built an ice chest/Vortex chiller last year and it does a hecka job, but needs about 50 lbs of ice. How long did the ice last in your design?
 
#5 ·
Good how-to, thanks! I have one of those old Lite F/X 1741 foggers, too. I built an ice chest/Vortex chiller last year and it does a hecka job, but needs about 50 lbs of ice. How long did the ice last in your design?
Not sure just yet as I haven''t really used it yet. I bet not too long since it's only a kitty litter pail and forcing hot fog through it.

I'd like to use a cooler but the wife "won't let me" buy a cooler and then put a hole in it. :eek:
I have an old long cooler but I think the cube ice chest cooler type would work a lot better with this design.

We have an annual halloween party for the family and it only it only lasts around 5 hours or so.
 
#9 ·
Well, since you are not "allowed" to ruin a cooler, why not squirt Great Stuff all over the outside for insulation, and make the chiller into a "rock" or amorphous blob, then paint it? You could get insulating value without sacrificing anything. Just a thought...

Good, cheap cooler design, by the way!

Ron
 
#10 ·
Thanks guys..

Was letting all the coats of paint to dry for a bit.
I should be getting it all finished this weekend and will post some in action shots and maybe if I can "borrow" a nicer vid cam then the one I have, I post up a video of it indoors and out.

Using Great stuff would be a cool idea. Especially if you could get it to look like a rock or something.
I actually got a can of that to start building those cool pvc candles I saw around here.
 
#12 ·
serialc0d3, you are my hero! I printed your directions and went to my DH's shop . We made our chiller in no time and tested it with 1" of ice and before we sealed it. OMG, it worked perfectly. We are waiting for the seals to cure before we try it again but I can't wait, it's gonna' be great. Thanks again for taking the time to post your directions! :):):)
 
  • Like
Reactions: Tyleete
#15 ·
I have a 400 watt "The Fog Machine" that I got from Wal Mart two years ago. It was by far the "coolest" prop on my street for two years :confused: The chiller with my newly designed cemetary scene will blow their minds this year ;) It is nice, sure, but it doesn't come near some of the pics I've seen on the HF!
 
#18 ·
Very "cool" indeed, and looks rather nice too!
I use the same cat litter but unfortunately I buy the huge bags and not the bucket. However it looks like I'll have to switch it up the next time, so that I can make one of these chillers for myself too! Thanx for sharing!!
 
#20 ·
Thanks for the pics. I'm new at fog chillin, and based on what I can tell from the pics, the fog enters the lower chamber, expands, rises through the ice (ice on top of grate), then flows into the outlet tube near the top, then flows out. Is that right?
 
#21 ·
Redom
I think your close. from the ones I have seen the fog enters and turns up as it opens in to the main chamber where the ice is the fog expands and falls through the ice lowering the ambient temperature of the fog. Then exits through the lower opening, by way of gravity driven forces..
 
#28 ·
Add another to the list of those who cant wait to build this chiller!
Have yet to get a fogger but figure the small 400watt will be fine for apartment use.

I think I will be using dry ice since it is so cheap here.
Was also thinking of using aluminum or even steel pipe for the up flow.Would this help even more to cool down the fog?
 
#29 ·
A 400 watt would be plenty for an apartment. I would suggest a timer controller too so someone wouldn't need to keep pressing the button and waiting for warm ups. I finally got a timer this year for my 400watter. :)

I would think aluminum would help over time and the pipes had a good chance to cool. Not sure how much but if ya have some scraps laying around go for it. :D
 
#31 ·
Well I bought my fog machine today. Party City had the 400watt on sale for $22 though I almost feel I should have got the 1000watt for $44 but thought about overkill ... ?
Anyway that fog juice is the ripoff man! 1 gallon cost me $15 and it's probably cheap stuff.
It goes by the name Fun-Lites.The fogger name is Techno 400 Fog Machine but I think it goes under different names at others stores.

I'm going to build the chiller tonight.Think I will use metal pipping instead so it gets colder.
San Diego is hot even in these months but the nights have been getting chilly so hoping that continues for better fog cover.

About the fog juice. How long can it stay in the machine.If I were to test it tonight, can I leave whats left in the machine without it harming? I wont add much but not sure if I should clean it out after the test run.
 
#32 ·
I usually empty mine out after using it although don't be afraid if you leave it in there. Actually I realized I didn't empty mine from last year and when I fired it up to test the chiller, it still worked fine.
I'm sure though that there is a risk that the pump could get clogged but IMO not after a few days or weeks.
 
#33 ·
Yes, I have been doing some reading on foggers and chillers.
I have all my materials for the chiller and will build this weekend.
I opted for ABS as they had more of what I wanted in parts than in PVC
I'm going for the "pack it up" style in that I am using threaded parts so as not to have permanent outlets so I can pack into tight spots after use.I just know the spot I want to store it in wont be big enough with the chiller having pipes sticking out... it always happens!