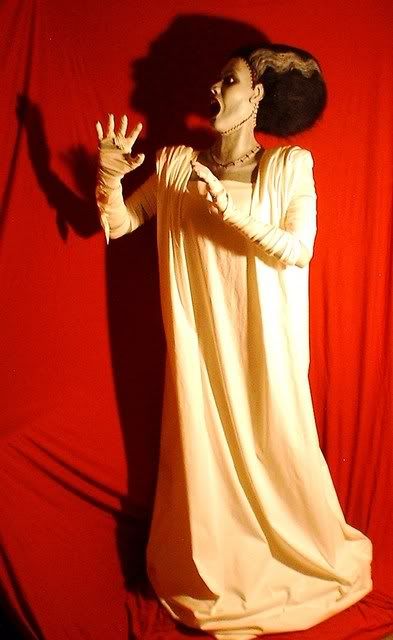
I get many requests on how to make a dress like the one I did for "The Bride" prop. Here are the directions I gave to the last person who asked and also front and back pics of the dress.
As far as her costume is concerned, it's really quite simple. I would suggest that you get yourself a long sleeved white t-shirt. You could also use a sleeveless one, but then you would have to wrap your arms and that could become uncomfortable if the wrapping is either too tight or keeps slipping down. Some shoulder pads would also help build up the top of the shoulders.
The neckline could be cut so that it is more squared or get a shirt with a low cut neckline. Cut a few holes in the sleeves to mimick the wrapping. Use some white gloves and cut off the fingers and make a few holes in those as well.
The dress is basically 6 yards of 54-60" wide fabric. You may need more or less depending on your height. Just measure from the top of your shoulder to the floor, add 3 or 4" if you want a hem, and double that measurement to find the yardage needed.
Take the fabric and fold it in half across the width. Then fold it in half across the length. Where the folds meet is the center of the yardage. This is where you'll cut an opening large enough to go over your head. Once you put this on, you can mark where you want the actual neck opening to be. Just as in regular garments, the back part of the opening usually rests higher than the front. Go ahead and cut the opening in a square shape and allow for at least 3/4" to fold under along the cut edge. You'll also need to clip the corners so the folded edge will lay flat. You can use fabric glue or fusible hem tape to secure this folded edge.
Okay, so now this thing is lookin pretty silly hanging on you right? You'll probably need someone to help you with the next part. Using two hands, pull up on the fabric at the shoulder about 2-3" away from your neck and create a fold and pin that in place. The do the same thing until you get 3 or 4 folds. Repeat this for the other side as well. Now it should look like a big piece of draped fabric with 4 folds at the shoulder and soft folds all the way down the front and back. Next, take all that extra fabric on the edges and fold it down and under your armpits. You can make this as high or low as you want, it really doesn't matter since you'll have your shirt underneath it anyway. To keep it simple, I'd just pin it closed with a few safety pins. This is also how you would hold the shoulder folds in place. I'm a big fan of safety pins for a quickie costume. You can hem the bottom or just cut it off at whatever length you want.
That's really all there is to this costume....draping and folding.
![Image]()
![Image]()
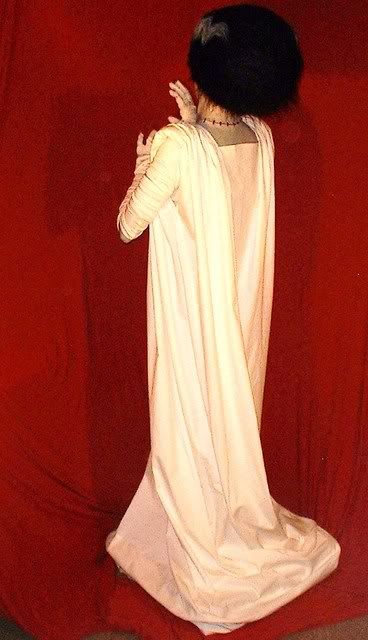
As far as her costume is concerned, it's really quite simple. I would suggest that you get yourself a long sleeved white t-shirt. You could also use a sleeveless one, but then you would have to wrap your arms and that could become uncomfortable if the wrapping is either too tight or keeps slipping down. Some shoulder pads would also help build up the top of the shoulders.
The neckline could be cut so that it is more squared or get a shirt with a low cut neckline. Cut a few holes in the sleeves to mimick the wrapping. Use some white gloves and cut off the fingers and make a few holes in those as well.
The dress is basically 6 yards of 54-60" wide fabric. You may need more or less depending on your height. Just measure from the top of your shoulder to the floor, add 3 or 4" if you want a hem, and double that measurement to find the yardage needed.
Take the fabric and fold it in half across the width. Then fold it in half across the length. Where the folds meet is the center of the yardage. This is where you'll cut an opening large enough to go over your head. Once you put this on, you can mark where you want the actual neck opening to be. Just as in regular garments, the back part of the opening usually rests higher than the front. Go ahead and cut the opening in a square shape and allow for at least 3/4" to fold under along the cut edge. You'll also need to clip the corners so the folded edge will lay flat. You can use fabric glue or fusible hem tape to secure this folded edge.
Okay, so now this thing is lookin pretty silly hanging on you right? You'll probably need someone to help you with the next part. Using two hands, pull up on the fabric at the shoulder about 2-3" away from your neck and create a fold and pin that in place. The do the same thing until you get 3 or 4 folds. Repeat this for the other side as well. Now it should look like a big piece of draped fabric with 4 folds at the shoulder and soft folds all the way down the front and back. Next, take all that extra fabric on the edges and fold it down and under your armpits. You can make this as high or low as you want, it really doesn't matter since you'll have your shirt underneath it anyway. To keep it simple, I'd just pin it closed with a few safety pins. This is also how you would hold the shoulder folds in place. I'm a big fan of safety pins for a quickie costume. You can hem the bottom or just cut it off at whatever length you want.
That's really all there is to this costume....draping and folding.